 Save
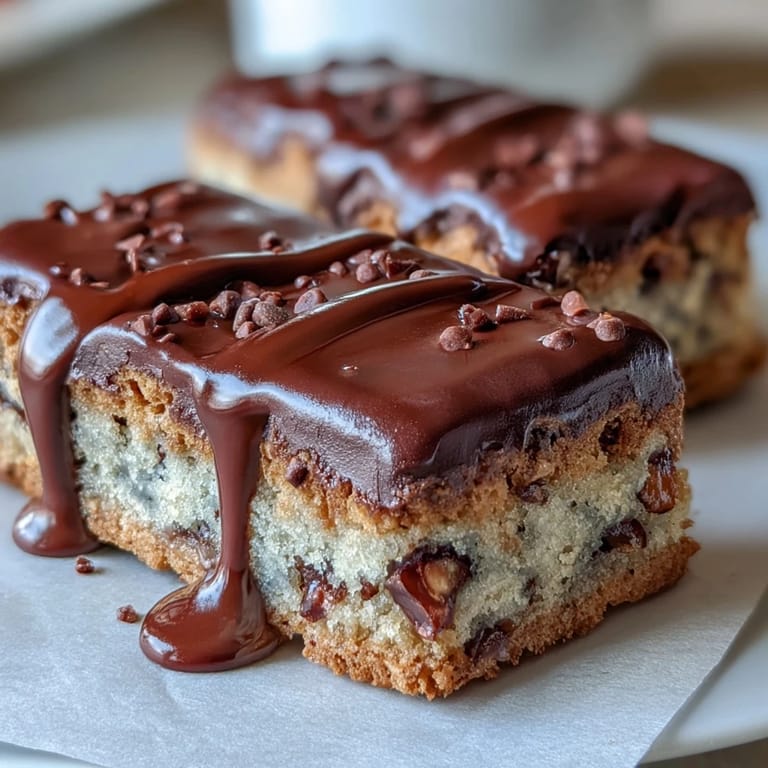
Save My neighbor called me in a panic two days before her daughter's graduation party, asking if I could whip up something celebratory that wouldn't require last-minute stress. These cookie bars came to mind immediately—they're the kind of dessert that looks impressive without demanding perfection, and honestly, they taste even better when made with a little kitchen chaos mixed in. The combination of chewy cookie base, colorful candies, and that silky white chocolate drizzle somehow captures the whole feeling of achievement and joy. What I love most is watching people's faces light up when they realize these are personalized with school colors, turning a simple treat into something that feels made just for the occasion.
I made these for my coworker's son's graduation open house, and watching the high schoolers devour them straight off the cooling rack made me realize how much power there is in a homemade dessert at a milestone moment. His mom later told me the bars disappeared before the cake, which felt like a small victory I didn't expect. That's when I understood these weren't just cookies—they were edible encouragement, something tangible to celebrate with.
Ingredients
- All-purpose flour (2 1/4 cups): The foundation that gives these bars their tender-chewy structure; don't sift unless you want a denser result, and avoid overmixing once you add it.
- Baking soda (1 tsp): This is your leavening agent, creating just enough lift to keep the bars from being a dense brick while maintaining that perfect chew.
- Salt (1/2 tsp): A seemingly small amount that amplifies every other flavor and prevents the sweetness from becoming cloying.
- Unsalted butter, melted (1 cup): Melting it first saves time and helps everything combine smoothly; let it cool slightly so the eggs don't scramble when you add them.
- Brown sugar and granulated sugar (1 cup and 1/2 cup): The brown sugar brings moisture and depth, while the granulated sugar adds structure—use both for the perfect balance of chewy and cakey.
- Eggs (2 large): These bind everything together and add lift; room temperature eggs mix more smoothly, though it's not a deal-breaker if yours are cold.
- Vanilla extract (2 tsp): Pure vanilla makes a noticeable difference here; the imitation stuff will work, but your taste buds will know.
- Semi-sweet chocolate chips (1 cup): The classic choice that plays well with white chocolate, though dark chocolate adds sophistication if that's your mood.
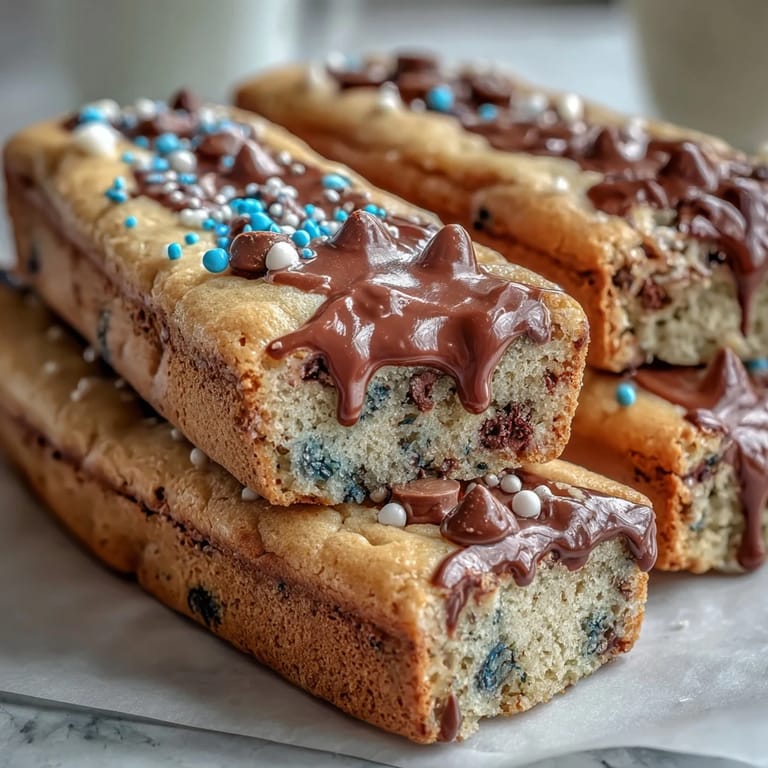
- Colored candy-coated chocolates (1/2 cup): These are your celebration marker—match them to school colors for instant festive energy and fun pops of color throughout.
- White chocolate (4 oz): Chop it yourself from a bar if possible, as it melts more smoothly than some chips, and add vegetable oil to prevent seizing.
- Vegetable oil (1 tsp): This thins the white chocolate just enough to drizzle without looking clumpy; coconut oil works too.
Tired of Takeout? 🥡
Get 10 meals you can make faster than delivery arrives. Seriously.
One email. No spam. Unsubscribe anytime.
Instructions
- Set your stage:
- Preheat the oven to 350°F and line your 9x13-inch pan with parchment paper, making sure it overhangs the edges a bit so you can lift the whole thing out later without wrestling. This small step saves so much frustration when the bars are cool and you're trying to cut them cleanly.
- Whisk the dry team:
- In a medium bowl, combine flour, baking soda, and salt, stirring them together thoroughly so the leavening is evenly distributed. Set this aside and resist the urge to mix it again—you've got it.
- Marry the wet ingredients:
- In a large bowl, whisk the melted butter with both sugars until the mixture looks smooth and slightly glossy, then add the eggs and vanilla one at a time, stirring until everything is well incorporated. This is where the cookie base gets its personality.
- Bring it together gently:
- Fold the dry ingredients into the wet mixture using a spatula or wooden spoon, stirring just until you don't see streaks of flour anymore; this is the moment overmixing becomes your enemy. A few lumps are fine and actually preferable to toughness.
- Fold in the celebration:
- Stir in the chocolate chips and colored candies until they're evenly scattered throughout the dough. Try to resist eating a handful of the candies at this point, though I won't judge if you don't.
- Press and bake:
- Spread the dough into your prepared pan in an even layer, smoothing the top with the back of a spatula or your hands, then bake for 23 to 25 minutes until the edges are lightly golden and a toothpick comes out mostly clean. The center should still look slightly soft—that's where the chew comes from.
- Cool with patience:
- Let the bars cool completely in the pan on a wire rack, which takes about 30 minutes; this step isn't glamorous, but it ensures your drizzle sets properly and you get clean cuts.
- Melt the white chocolate magic:
- Chop or use white chocolate chips and add vegetable oil, then microwave in 20-second bursts, stirring between each round until completely smooth and pourable. Overheating white chocolate turns it grainy and unforgiving, so those short bursts matter.
- Drizzle with intention:
- Pour the melted white chocolate into a piping bag, squeeze bottle, or use the back of a spoon to create those signature drizzles across the top of the cooled bars. Add colored sprinkles immediately if using, while the chocolate is still wet enough for them to stick.
- Let it set and cut:
- Allow the drizzle to harden for about 20 minutes at room temperature, then use the parchment overhangs to lift the whole sheet out of the pan and cut into 16 neat squares. A sharp, warm knife dipped in hot water between cuts helps prevent the white chocolate from dragging.
 Save
Save There's something quietly powerful about standing in a kitchen making something specifically designed to celebrate someone else's milestone. When my friend's sister took a bite and said, "These are fancy enough to be from a bakery," I realized that these bars do exactly what graduation desserts should—they make the moment feel special without pretending to be something they're not.
Customization is Your Superpower
The beauty of these bars is that they practically beg to be personalized, and that's where they transform from a recipe into a statement. Use the colored candies to match school colors—I've made them in school blue and gold, purple and white, even red and black for the sports fans. You can substitute dark chocolate chips if semi-sweet feels too mild, or mix in crushed pretzels or toasted nuts for unexpected texture. The drizzle is your canvas, so if white chocolate isn't your thing, try a milk chocolate version thinned with the same vegetable oil method, or skip it entirely and dust the warm bars with powdered sugar instead.
Storage and Make-Ahead Magic
These bars stay soft and delicious in an airtight container at room temperature for up to four days, which means you can make them a day or two ahead of the party without stress. If you need to transport them, cut them after the drizzle sets completely, layer them gently between parchment paper, and they'll survive a car ride without falling apart. The dough can also be prepared and refrigerated up to 24 hours before baking—just spread it cold in the pan and add a minute or two to the baking time.
The Perfect Celebration Pairing
These bars pair beautifully with simple drinks—milk, coffee, hot chocolate, or cold lemonade all work equally well, and that's the mark of a truly versatile dessert. I've served them alongside fruit platters at morning celebrations and next to ice cream at evening parties, and they adapt to whatever atmosphere you're creating.
- Cut them into slightly smaller squares if you're serving a crowd and want them to feel elegant rather than indulgent.
- Make extra and freeze the unfrosted bars in an airtight container for up to a month, then drizzle fresh when you need them.
- Trust your instincts on the baking time—every oven runs differently, so start checking at 23 minutes and pull them when the edges look set but the center still jiggles slightly.
 Save
Save These bars represent something bigger than the sum of their ingredients—they're an easy way to show up for someone's moment with something homemade and thoughtful. Make them with joy, customize them boldly, and watch them disappear.
Recipe FAQs
- → What ingredients create the chewy texture?
The combination of melted butter, brown sugar, and eggs provides moisture and softness, resulting in a chewy texture.
- → Can I substitute the candy-coated chocolates?
Yes, feel free to use dark or milk chocolate chips, or different colored candies to suit your theme.
- → How do I melt the white chocolate for drizzling?
Melt white chocolate with a teaspoon of vegetable oil in short microwave intervals, stirring until smooth for easy drizzling.
- → What baking pan size should I use?
Use a 9x13-inch baking pan lined with parchment paper to ensure easy removal and even baking.
- → How long do these bars stay fresh?
Store them in an airtight container at room temperature for up to four days to maintain quality.